If you’re anything like me, you love tinkering with your golf cart and figuring out how it works.
I know firsthand how frustrating it can be to trace those electrical connections without a proper EZGO Golf Cart Wiring Diagram.
Well, today, I’ve got something special for all you golf cart aficionados out there – an EZGO Ignitor Wiring Diagram!
EZGO Ignitor Wiring Diagram
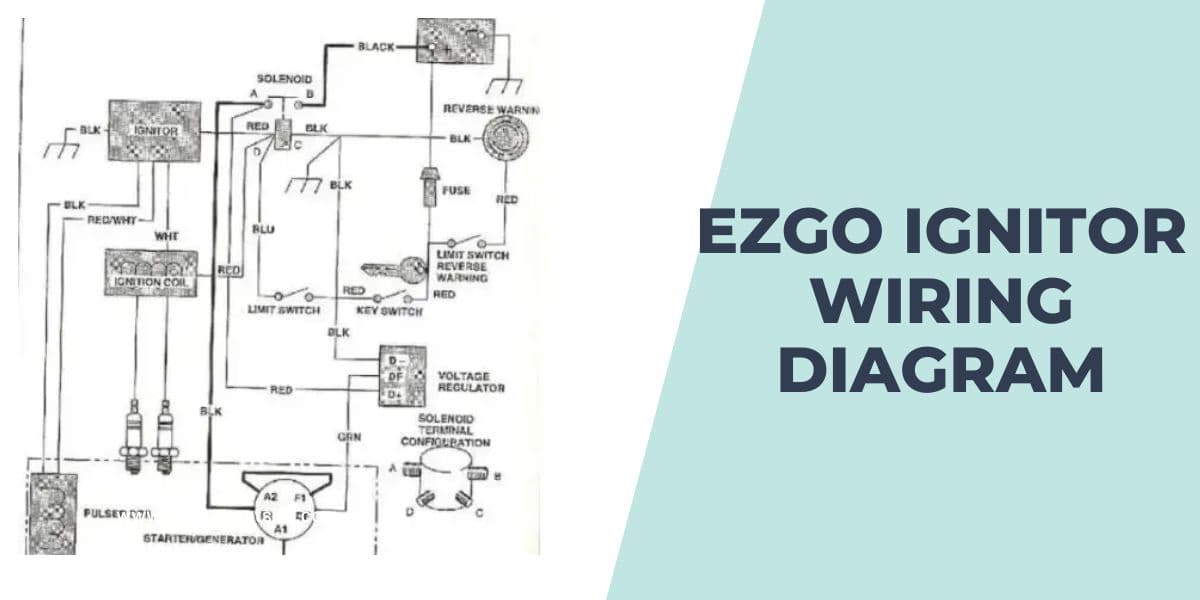
This is the EZGO ignitor wiring diagram:

If you’re looking for a comprehensive guide to the EZGO starter generator wiring diagram, check out my detailed post on EZGO Starter Generator Wiring Diagram.
Understanding the EZGO Ignitor Wiring Diagram
Understanding the EZGO Ignitor Wiring Diagram may seem daunting at first, but fear not! Once you grasp the basics, it’s like deciphering a secret code. Let’s break it down.
First, locate the ignition switch. This is where the power flows. When you turn the key, it activates the solenoid, which acts as a bridge to the starter motor. The key switch adds an extra layer of security, making sure only authorized users can start the cart.
After that, the battery steps in, providing the necessary juice. The ignitor, connected to the ignition switch, takes charge of timing and firing the spark plugs. These plugs create sparks that ignite the fuel mixture in the engine cylinders.
To keep everything connected, we have the wiring harness, the backbone of the system. It ensures proper communication between components.
Components of the EZGO Ignitor Wiring Diagram
Here are the components of the EZGO Ignitor Wiring Diagram:
- Ignition Switch: This is where the magic begins. It allows you to power up your EZGO golf cart and start the engine.
- Solenoid: Acting as a relay, the solenoid is responsible for engaging the electrical circuit that powers the starter motor. When you turn the key, it sends a signal to the solenoid to initiate the starting process.
- Key Switch: This component is connected to the ignition switch and acts as a security feature. It ensures that only authorized users can start the cart by requiring the correct key.
- Battery: The heart of the electrical system, the battery provides the power needed to start the engine and operate the various electrical components of the EZGO cart.
- Ignitor: The ignitor, also known as the ignition control module, plays a vital role in the ignition process. It receives signals from the ignition switch and controls the timing and firing of the spark plugs.
- Spark Plugs: These small but mighty devices create the sparks needed to ignite the fuel mixture in the engine cylinders, kickstarting the combustion process.
- Wiring Harness: The wiring harness serves as the nervous system of the EZGO cart, connecting all the electrical components and ensuring they communicate and function properly.
If you also need a detailed guide on how to wire a 6 pin rocker switch, check out my comprehensive 6 Pin Rocker Switch Wiring Diagram.
How to Troubleshoot Common Issues Using the Ezgo Ignition Wiring Diagram
Here is a step by step guide on How to Troubleshoot Common Issues Using the Ezgo Ignition Wiring Diagram:
- Identify the Problem: Start by pinpointing the specific issue you’re facing. Is the cart not starting at all? Are there intermittent electrical problems? Having a clear understanding of the problem will guide your troubleshooting process.
- Inspect Wiring Connections: Refer to the Wiring Diagram to locate the relevant wiring connections. Check for loose, damaged, or corroded connections. Ensure all wires are properly connected and secure.
- Test the Ignition Switch: Use a multimeter to test the ignition switch for continuity and proper functioning. Make sure it’s sending the correct signals to the other components.
- Check the Battery: Measure the battery voltage using a voltmeter. If the voltage is low, recharge or replace the battery as needed. Clean the battery terminals and ensure a solid connection.
- Examine the Ignitor and Spark Plugs: Inspect the ignitor for any visible damage. Test the spark plugs to ensure they’re producing a spark. Replace faulty ignitors or spark plugs accordingly.
- Follow the Wiring Harness: Trace the wiring harness connections according to the diagram. Look for any damaged wires, frayed insulation, or exposed conductors. Repair or replace as necessary.
Frequently Asked Questions
These are the Frequently Asked Questions about the EZGO Ignition Wiring Diagram:
What is an EZGO Ignition Wiring Diagram?
An EZGO Ignition Wiring Diagram is a visual representation of the electrical connections and components involved in the ignition system of an EZGO golf cart.
Can I use the Wiring Diagram for other golf cart brands?
The EZGO Ignition Wiring Diagram is designed explicitly for EZGO golf carts. While some concepts may be similar across different brands, it’s recommended to refer to the specific wiring diagram provided by the manufacturer of your golf cart for accurate information.
What if I encounter a problem not addressed in the Wiring Diagram?
If you encounter a problem not covered in the Ignition Wiring Diagram, consult a professional technician or reach out to EZGO customer support for assistance. They can provide further guidance and troubleshooting steps based on your specific issue.
Conclusion
The EZGO Ignition Wiring Diagram serves as a valuable resource for anyone seeking to understand the intricate connections that power their EZGO vehicle. By providing a clear visual representation and accompanying instructions, this diagram eliminates the guesswork and makes troubleshooting and repairs a breeze.
Its user friendly design and modern approach empower enthusiasts and professionals to tackle any wiring related challenges confidently. So, whether you’re a seasoned mechanic or a DIY enthusiast, the EZGO Ignition Wiring Diagram is your go to companion for a smooth and hassle free ride.


