Last year, while prepping my EZGO for a sunny day on the green, I realized the importance of truly understanding the ins and outs of its rear axle.
Thank goodness for the EZGO TXT Rear Axle Diagram, my new roadmap to understanding my cart’s backend.
Before you think of it as just another complicated schematic, join me as we break down the diagram, piece by piece.
EZGO TXT Rear Axle Diagram
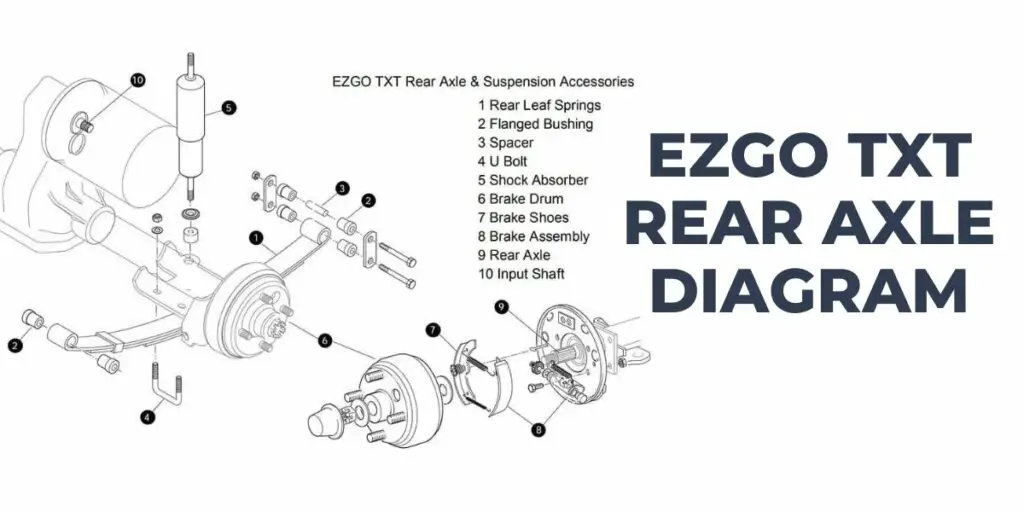
This is the EZGO TXT Rear axle diagram:

For a comprehensive view of all components, be sure to check out our EZGO TXT Parts Diagram to dive deeper into the mechanics of your golf cart.
Understanding the EZGO TXT Rear Axle Diagram
The EZGO TXT rear axle diagram refers to a schematic or visual representation of the rear portion of an EZGO TXT golf cart. It provides a detailed view of the components and wiring connections in the rear section of the golf cart.
It includes information about various parts such as the rear axle, brakes, suspension, and electrical connections.
It helps in understanding how these components are positioned and interconnected, enabling users to troubleshoot issues or perform maintenance tasks effectively.
When you refer to the diagram, you will be able to identify specific parts, locate wiring connections, and better understand the overall layout and functionality of the rear section of the golf cart. This knowledge can be valuable when undertaking repairs, modifications, or upgrades.
If you’re also considering a complete overhaul, check out our guide on EZGO Engine Replacement for a comprehensive step-by-step process.
Components of the EZGO TXT Rear Axle Diagram
These are the components of the EZGO TXT Rear axle Diagram:
- Rear Axle: The rear axle is responsible for transmitting power from the motor to the rear wheels. It connects the wheels to the rest of the drivetrain and allows for smooth rotation and movement.
- Rear Suspension: The rear suspension system helps provide a comfortable and stable ride by absorbing shocks and bumps. It typically includes components such as leaf springs, shocks, and control arms.
- Rear Brakes: The rear brakes are essential for slowing down and stopping the golf cart. They usually consist of drum or disc brakes, brake shoes or pads, and a braking mechanism that engages when the brake pedal is pressed.
- Rear Differential: The rear differential is a component that allows the wheels to rotate at different speeds when turning, providing better maneuverability. It helps prevent tire scrubbing and excessive wear.
- Rear Wheels and Tires: The rear wheels and tires provide traction and support to the golf cart. They are usually mounted on the rear axle and come in various sizes and tread patterns depending on the terrain and purpose of the vehicle.
- Rear Lights: The rear lights are important for visibility and safety. They include tail lights, brake lights, and turn signals, which alert other drivers and pedestrians about the golf cart’s movements.
- Wiring Connections: The rear diagram may also show the electrical wiring connections related to the rear components. This includes connections for lights, brakes, sensors, and other electrical devices in the rear section of the golf cart.
If you’re looking to elevate your ride even further, check out our guide on the Best Lift Kit for EZGO Golf Cart Models.
How to Troubleshoot Common Issues Using the EZGO TXT Rear Axle Diagram
Follow these steps to troubleshoot common issues using the EZGO TXT Rear Axle Wiring Diagram:
- Identify the Issue: Start by narrowing down the problem. Is there a noise coming from the rear? Is there an issue with wheel rotation? Pinpointing the symptom will help you focus on the relevant parts of the diagram.
- Consult the Diagram: Access your EZGO TXT Rear Axle Diagram. Familiarize yourself with the different components and their placements. For first-timers, it might help to color-code or label the parts to make it easier to identify them.
- Trace the Wiring: If the problem seems electrical, trace the wiring on the diagram to check for any breaks, disconnections, or shorts. This will help you identify if any wires need to be replaced or reconnected.
- Check for Physical Damage: Use the diagram to identify key components that might be vulnerable to wear and tear. Examine these parts in your golf cart for any signs of damage, such as cracks, rust, or deformities.
- Lubrication Points: The diagram will also indicate areas that require regular lubrication. Ensure these points are well-lubricated to avoid unnecessary wear and ensure smooth operation.
- Cross-Reference with Manuals: If you’re unsure about a particular component or its function, refer to the EZGO TXT user manual. It will provide detailed explanations that can be cross-referenced with the axle diagram.
- Seek Expert Advice: If you’ve consulted the diagram and still can’t identify or resolve the issue, it might be time to consult a professional or an online forum dedicated to EZGO carts. They can provide insights based on the symptoms you’ve observed.
- Safety First: Always ensure that the cart is in a safe position, preferably on a flat surface and turned off, when examining or working on it. Remember to disconnect the battery before working on any electrical components.
- Document Your Findings: As you troubleshoot, make notes on any abnormalities or changes you observe. This will help you track the health of your golf cart’s rear axle system and provide a reference for future troubleshooting.
- Routine Checks: Preventive measures go a long way. Regularly consulting the diagram and performing checks, even when there’s no evident issue, can help you catch potential problems early on.
If you’re looking to enhance your ride’s smoothness and performance, don’t miss our guide on the Best Shocks for EZGO Golf Cart.
FAQs on EZGO TXT Rear Axle Diagram
These are the most frequently asked questions about the EZGO TXT Rear Axle Diagram:
How do I know which wiring diagram is appropriate for my EZGO TXT model and year?
The correct wiring diagram for your specific EZGO TXT model and year can be determined by referring to the golf cart’s user manual or by providing the model and year information to the EZGO customer support team.
What are the different components and symbols represented in the wiring diagram?
The wiring diagram typically includes symbols and labels for various components such as batteries, switches, lights, relays, connectors, and wires.
What should I do if I cannot find a specific component or connection in the EZGO TXT Rear Axle Diagram?
If you cannot locate a specific component or connection in the EZGO TXT Rear Axle Wiring Diagram, double-check the model and year information and consult the user manual.
Conclusion
The EZGO TXT Rear Axle Diagram serves as an invaluable resource for anyone working with EZGO TXT rear axle wiring. it simplifies the troubleshooting and installation process, making it accessible even to those new to the task.
So, whether you’re a seasoned professional or a DIY enthusiast, the diagram is sure to save you time and frustration. Hence, go ahead and dive in with confidence, knowing that you have a reliable companion to navigate your EZGO TXT golf cart rear wiring needs.


